PROXIMANOVA-LIGHT.OTF PROXIMANOVA-LIGHTIT.OTF PROXIMANOVA-EXTRABLD.OTF PROXIMANOVA-BOLD.OTFPROXIMANOVA-BLACK.OTF
Get this font in here!
This Article Applies to:
- Avast Business Hub
Tasks will only run on the assigned devices when those devices are online and communicating with the console.
Device scans are a key component to the Antivirus protection of your devices. The more often your users download files from the web or install software, the more often you should perform scans. The more often you perform scans, the more likely you will catch malicious threats before they do damage to your devices and networks.
Custom Scan runs a scan according to the parameters of your choosing, providing the most control over what specific types of files, folders, programs, and processes are included in the scan.
To configure and run an immediate, one-time Custom Scan:
- Go to the Devices page
- Do one of the following:
- For a single device, click the actions menu (three dots) next to it, then hover over the Scan option
- For multiple devices, tick the checkboxes next to them, then hover over the Scan option above the device list
- Select Advanced Antivirus Scans
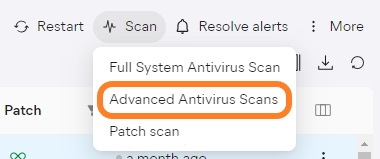
- In the drawer that opens, choose Custom Scan
- Specify the locations and file types to be scanned, scan sensitivity and performance, and Antivirus actions following malicious content detections (see Customization Options below for more information)
- Click Start Scan Now

To learn how to handle any detect threats, see
Customization Options
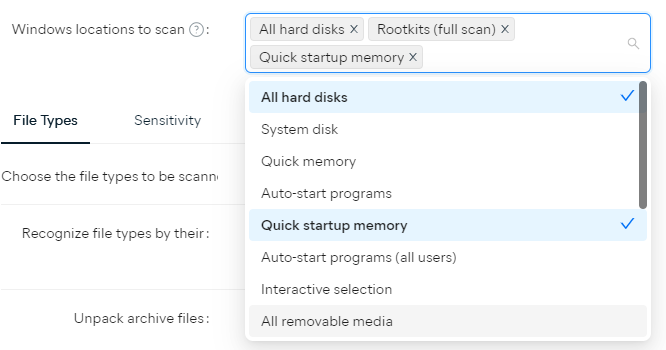
Specifying Scan Locations
In the Windows locations to scan field, you can define the locations to be scanned by either typing their paths manually or choosing from the following preset locations in the drop-down menu:
- All hard disks
- System disk
- Quick memory
- Auto-start programs
- Quick startup memory
- Auto-start programs (all users)
- Interactive selection
- All removable media
- CD-ROM and DVD drives
- Rootkits (full scan)
- Rootkits (quick scan)
- Rootkits (super-quick test)
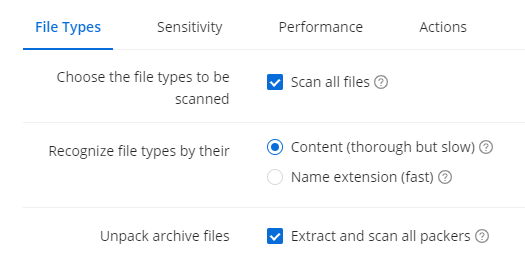
Specifying File Types To Be Scanned
The settings under the File Types tab allow you to choose whether to scan all files for threats (the scan may be slower but more extensive). Additionally, you can configure the scan to recognize file types by their content (safer but requires more time) or by their name extension (faster but not as thorough)..zip (slower, but more extensive scan).
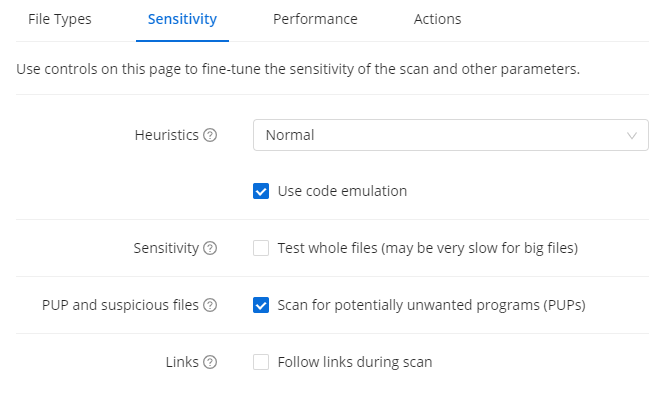
Specifying Scan Sensitivity
Under the Sensitivity tab, you can adjust the sensitivity of the scan in several ways:
- Heuristics: Heuristics enable Antivirus to detect unknown malware by analyzing code for commands that may indicate malicious intent. The default setting is Normal. With higher sensitivity, Antivirus is more likely to detect malware, but also more likely to make false-positive detections that incorrectly identify files as malware.
- Use code emulation: Choose whether to use code emulations to unpack and test suspected malware in an emulated environment, where the files cannot cause damage to devices.
- Sensitivity: Choose whether to test whole files (the scan may be slower but more extensive).
- PUP and suspicious files: Choose whether to scan for Potentially Unwanted Programs (PUPs) and other suspicious files.
- Links: Choose whether any links within files are also checked during the scan (the scan may be slower but more extensive).
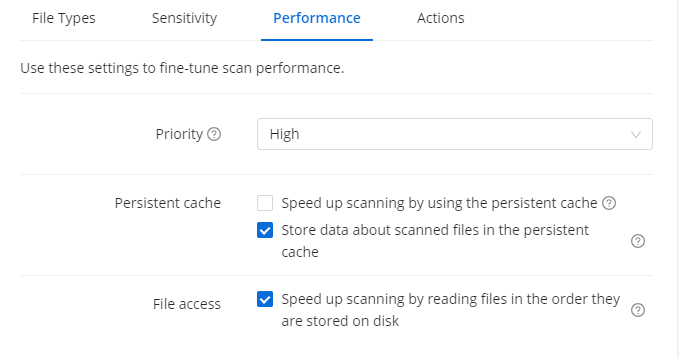
Specifying Scan Performance
Via the Performance tab, you can define the following scan parameters:
- Priority: Choose the priority of the scan on the end device(s). A higher priority will lead to a quicker scan, but will use more resources.
- Persistent cache: Choose whether to speed up the scan by consulting the persistent cache before scanning each file and/or to populate the presistent cache with data about scanned files (which will slow down the scan).
- File access: Choose whether to speed up the scan by reading files in the order they are stored on the disk, thus minimizing the number of seek operations (only effective on NTFS volumes).
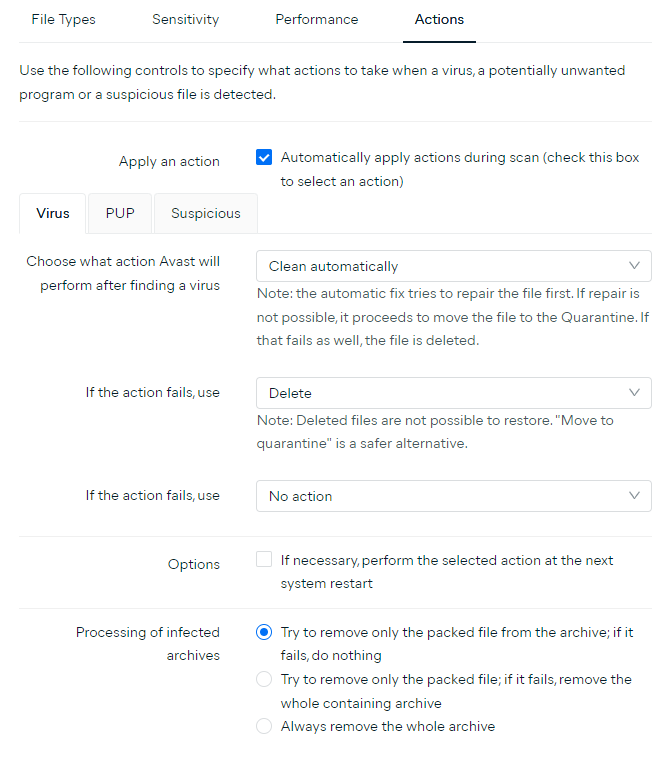
Specifying Antivirus Actions
To enable automatic actions when the scan detects a threat, tick the Automatically apply actions during scan checkbox at the top of the Actions tab.
Then, define how viruses, PUPs, and suspicious objects are handled when detected. For each type, it is possible to configure three actions to perform, with the "if the action fails" value. The following actions can be selected from the drop-down menus:
- Clean automatically: Runs a sequence of actions (repair file; if not possible, then move to Quarantine; if not possible, then delete)
- Move to quarantine: Sends the threat to Quarantine, where it cannot harm your system
- Repair: Removes only malicious code attached to an otherwise safe file — this is not possible for files that are entirely malware
- Delete: Permanently removes the file from your computer
- No action: No action is taken during the scan; the threat is listed in your scan results and you can decide what to do later
For example, you can set the first action to Repair. If that fails, then Move to quarantine. If that then fails as well, the final action can be to Delete the file. If the final action also fails, nothing further will be performed (file will continue to be blocked).
You can also choose whether to perform the selected action at next system restart by ticking the respective checkbox.
Lastly, the Processing of infected archives option allows you to choose how to handle infected archives:
- Try to remove only the packed file from the archive; if it fails, do nothing
- Try to remove only the packed file from the archive; if it fails, remove the whole containing archive
- Always remove the whole archive
By default, the first option is selected, as the remaining two options can lead to issues if there is a false positive, and the archive may be deleted if too large.
Additional Options and Settings
Viewing Task Details and Stopping Tasks
To learn how to access your tasks' details or stop tasks, please refer to
Scheduling Custom Scans
Currently, custom scans can be scheduled only via the local client. For more information, see
Other Articles In This Section:
Configuring and Running Boot-Time Scans
Updating Antivirus Program and Virus Definitions
Shutting Down and Restarting Devices
Related Articles: