PROXIMANOVA-LIGHT.OTF PROXIMANOVA-LIGHTIT.OTF PROXIMANOVA-EXTRABLD.OTF PROXIMANOVA-BOLD.OTFPROXIMANOVA-BLACK.OTF
Get this font in here!
This Article Applies to:
- Avast Business CloudCare
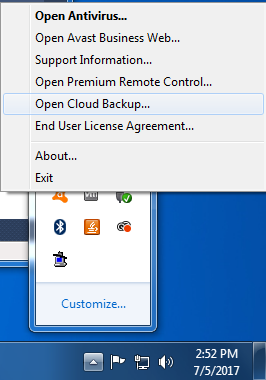
On end devices, you can access the Cloud Backup Client by right-clicking the Avast Business CloudCare system tray icon and selecting Open Cloud Backup from the context menu. You will be prompted for the password entered during account creation. You can also select a different device to manage if necessary by selecting it from the drop-down menu.
Many of the settings in the CloudCare portal can be overridden by the client settings unless you selected the Override the local client configuration option in the policy. For more information, see Overriding Local Policy in Cloud Backup.
Configuring Backups
- Next to File and Folder Backup in the Cloud Backup client, click Configure.
- Choose either to Scan all folders, Just scan my personal folders, or Do not scan (select files manually). Then use the check boxes beside specific file types to back them up, or select Custom to set up more advanced parameters.
- If you click the Advanced button, you have additional configuration options. You can include file sizes, exclude folders, file types, and files, and also add custom file types to be included in the scan.
- Click Next once you have configured which files and folders you will be backing up.
- In the next window you will see a list of the files and folders on the computer that fit your configuration settings. Select the files to protect using the checkboxes. The bar at the bottom will indicate how much data will be backed up. Click Next to continue to the next step.
- If a Mapped Network drive is selected, you will be prompted to add a network location before you can select files to back up on the mapped drive.
- By default, Back up at the end of this wizard is selected and a schedule will not be set with this option. If you would like to set a schedule, check the box beside Back up automatically without user intervention or Back up even when Windows user is not logged on. For the latter, you will be prompted for the Windows domain and logon credentials.
- Click Finish to exit the wizard and start the backup.
Scheduling Backups
First, select either Back up automatically without user intervention or Back up even when Windows user is not logged on in the configuration menu
- Hourly: will run a backup every x number of hours. You can enter the number of hours between backups in the Schedule box.
- Daily: will run a backup every day. You can select the start time and end time, which can be either until interrupted/finished or until a specific time, in the Schedule and Timing boxes.
- Weekly: will run a backup every week on a specific day. You can select the day of the week, as well as the start and end time, which can be either until interrupted/finished or until a specific time, in the Schedule and Timing boxes.
- Monthly: will run a backup every month on a specific numerical day of the month. You can select the day of the month, as well as the start and end time, which can be either until interrupted/finished or until a specific time, in the Schedule and Timing boxes.
- For Monthly backups, we do not recommend selecting the 29th, 30th, or 31st day of the month for the backup, as these dates do not occur every single month.
Deleting Backed Up Files
- Next to Used Space in the Cloud Backup Client, click View / Restore
- Click on the plus symbol next to each folder to expand its contents
- Highlight the file or folder you want to delete, then press the delete icon
- Click Yes in the confirmation window to confirm you want to delete the selected item(s)
Restoring Backed Up Files
- Next to Used Space in the Cloud Backup Client, click View / Restore
- Click on the plus symbol next to each folder to expand its contents
- Highlight the file or folder you want to restore, then press the restore icon
- Once the recovery process has completed, click Open destination directory to view the restored files
For information on how to restore files from the CloudCare portal, see Restoring Backed Up Files.
Setting Retention Policies
- Next to Advanced Folder Backup in the Cloud Backup Client, click Configure
- Click Add Network Connection to add a network address or the Add button to add a specific file or folder
- After adding all files and folders you wish to back up, click Next
- Set the Retention Policy for the selected data from the following options:
- Replicate: Files are backed up to the Cloud as they are added or changed and removed from the cloud if they are deleted locally
- Forever Save: Files are never automatically deleted from the cloud nor the local machine
- Archive: When the files are confirmed on the local backup servers, they are deleted from the local machine storage
- Time-Limited Backup: When files are backed up on the cloud, they are only kept x number of days before being deleted from the local machine storage. This resets if a new version of the file is backed up
- Cloud Time-Limited Backup: When files are backed up on the cloud, they are only kept x number of days before being deleted from the server. This timer resets if a new version of the file is backed up
- If you would like to skip files that were modified more than x number of days ago, enable the check beside that option. Then click Next
- If multiple folders or locations were added, you can click on each one and set up individual backup schedules. Once you have selected the schedules, click Finish
Client Advanced Options
The Advanced Options section of the Cloud Backup Console allows you to set Bandwidth Throttling, change Caching Options, select the Restore Destination Folder, set Protected File Type Filters, Enable SSL and change the interface language. The recommended settings for each option are set by default.
Client File-Level Reports
The history of completed backup reports can be viewed by selecting the File-Level Reports.