PROXIMANOVA-LIGHT.OTF PROXIMANOVA-LIGHTIT.OTF PROXIMANOVA-EXTRABLD.OTF PROXIMANOVA-BOLD.OTFPROXIMANOVA-BLACK.OTF
Get this font in here!
This Article Applies to:
- Avast Business Hub
Web Control is a content-filtering tool that provides an additional layer of protection to your devices by preventing access to websites known or suspected to spread malware, spyware, spam, or engage in phishing activities. It can also be used to block any other content you deem unwanted.
Requirements
The Business Agent will install the service. The requirements for Web Control are the same as the Business Agent and the Antivirus service (as Web Control cannot function without the Antivirus service).
 System
Windows
- 11 — x64
- 10 (Pro, Education, and Enterprise editions) — x64
- 8/8.1 (all versions except RT and Starter Edition) — x64
- 7 SP1
- Server 2016 R2 or higher — x64
macOS
- macOS 10.13 (High Sierra) or higher
Hardware
Processor
- 1.5GHz Intel® Pentium® 4 or faster processor (or equivalent), supports SSE3 instructions (no ARM support)
Memory
- 1GB RAM
Disk space
- 2GB
Firewall
Ports
- UDP 53 DoH enabled
- TCP 80
- TCP/UDP 443
- TCP 7500
URLs
- *.avast.com
- *.avcdn.net
Other Requirements
- Avast Business Antivirus for Windows v. 23.10 or higher / Avast Business Antivirus for macOS v. 15.8 or higher
- Web Shield must be enabled on the endpoints for Web Control to work. For Antivirus versions older than 24.2 (Windows), Real Site is also required.
- Windows Business Agent v. 23.6 or higher / macOS Business Agent v. 24.5 or higher
- Internet connection required to operate the service
Supported Browsers
Windows
- Google Chrome
- Mozilla Firefox
- Waterfox
- Internet Explorer
- Microsoft Edge
- Opera
- Brave
- SeaMonkey
- QQ Browser
- UC Browser
- Baidu (Spark)
- Maxthon
- Vivaldi
- Sogou Explorer
- Avast Secure Browser*
- AVG Secure Browser*
- CCleaner Browser*
*Partial support for our browsers, due to them using their own DNS and built-in VPN.
macOS
- Safari
- Google Chrome
- Mozilla Firefox
- Microsoft Edge
- Chromium
- Opera
- Brave
- Vivaldi
- Yandex Browser
- Arc
- Avast Secure Browser*
- AVG Secure Browser*
- Avira Secure Browser*
- Norton Secure Browser*
*Partial support for our browsers, due to them using their own DNS and built-in VPN.
Installing and Uninstalling Web Control
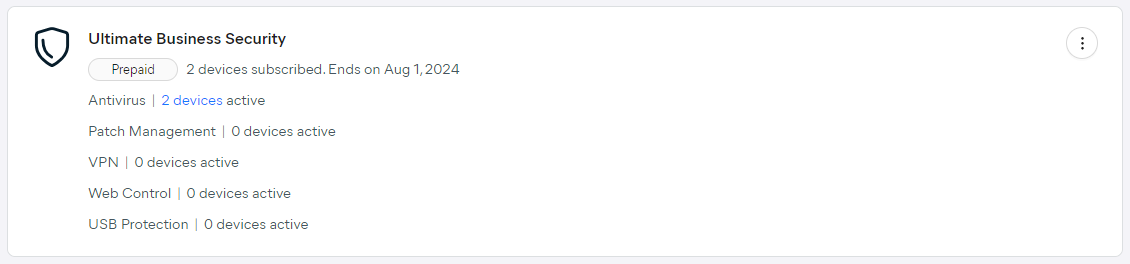
To add Web Control to your devices, you need to subscribe to either Premium or Ultimate Business Security, as the Essential Business Security subscription doesn't offer this service.
To activate an additional subscription or upgrade to Premium or Ultimate Business Security, see Activating and Upgrading Subscriptions.
Once purchased, the subscription will show Web Control available, and the number of devices using the service. Clicking the device count link (available once you add the service to one or more devices) will bring you to the Devices page, filtered to show devices with Web Control enabled.
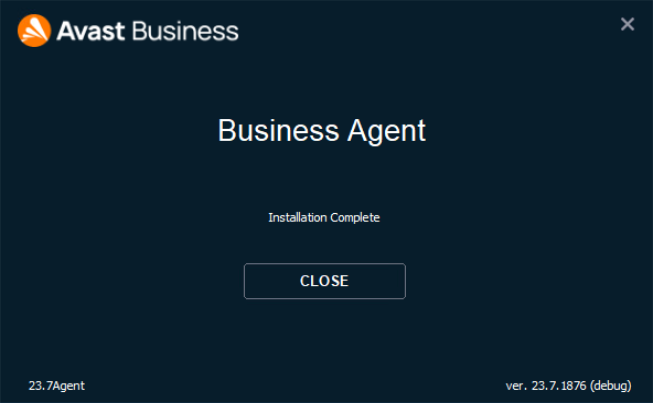
The Web Control service will be available for new installations as part of the Business Agent deployment.
For more information on new installations, see

Note that Web Control relies on the Web Guard component to function. Therefore, the Antivirus service must also be installed (and Web Shield enabled). If you attempt to deselect Antivirus, Web Control will automatically be deselected.
If the installed Antivirus service (Windows) is older than version 24.2, you will also need to enable Real Site. Newer versions do not require this for Web Control to work.
Download the package and execute the installer as usual - the Agent will install alone, and then install Web Control afterward.
Upon installation, you will need to restart the device.
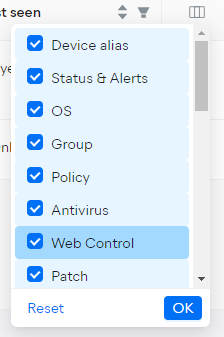
Inside the Business Hub, the Web Control service can be seen on the Devices page through selecting the Web Control column.
Once added, the column will display the Web Control icon and toggle.
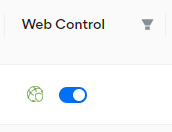
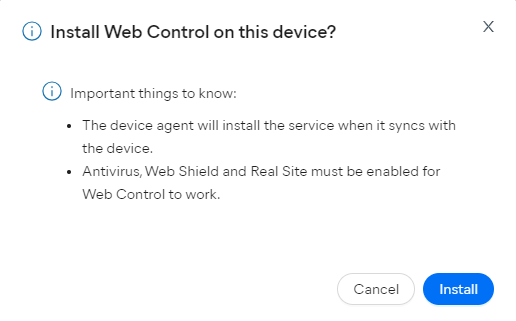
Existing devices can add Web Control post-installation using this toggle — click it so that it turns blue, then confirm the action by clicking Install in the pop-up dialog.
The service will be installed once the Agent syncs with the device.
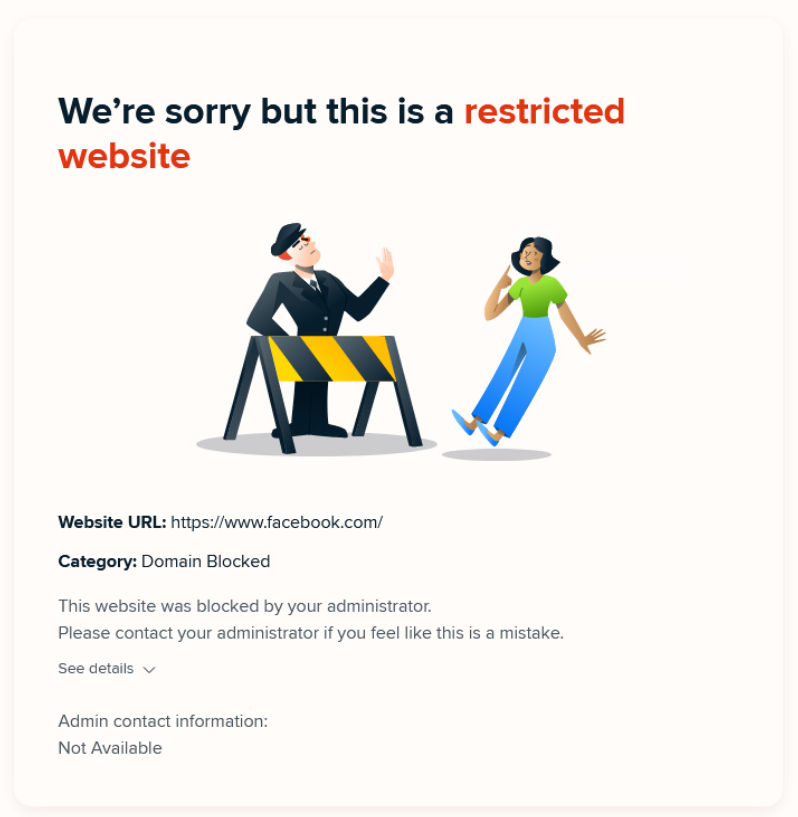
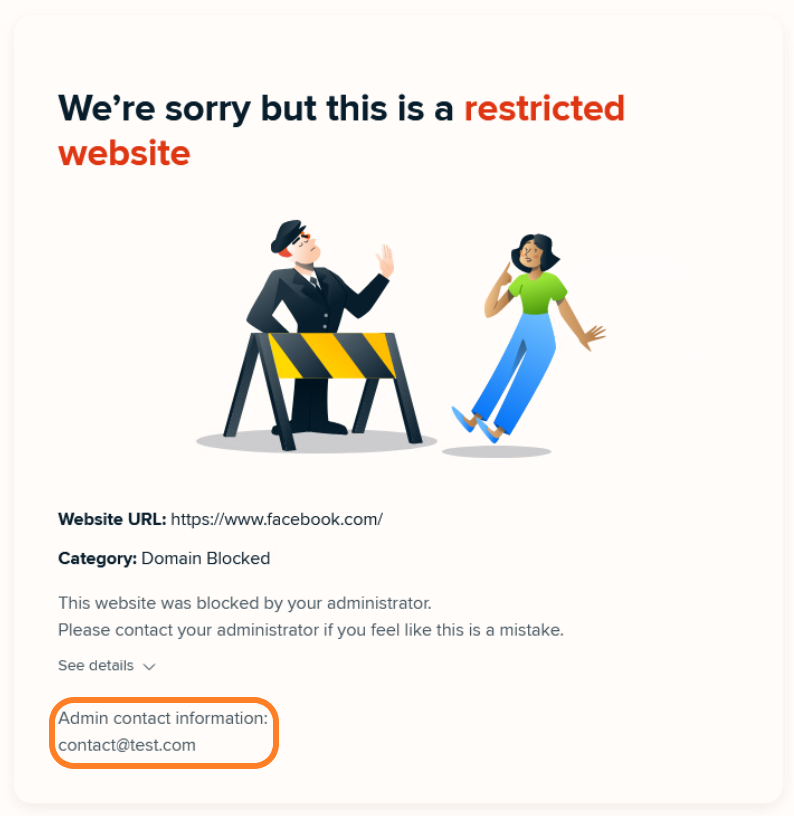
On the client side, there will be no indications that Web Control is installed, since the service uses the Business Agent to operate. However, when an endpoint's access to a website is blocked, a dialog will be displayed directly in the browser, informing the user that the website is restricted.
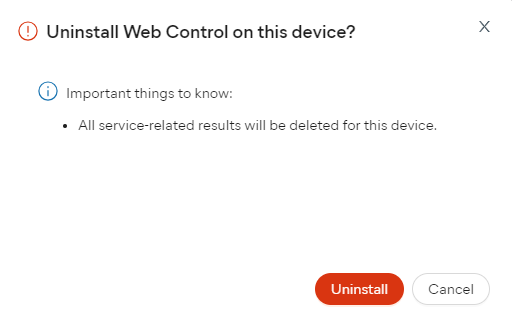
To uninstall Web Control from a device, click the toggle so that it turns gray, then confirm the action by clicking Uninstall in the pop-up dialog.
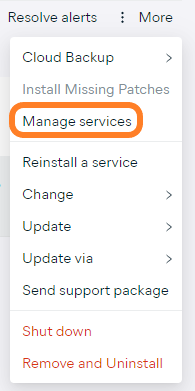
You can also bulk change the Web Control service to off/on via the Manage Services option.
For
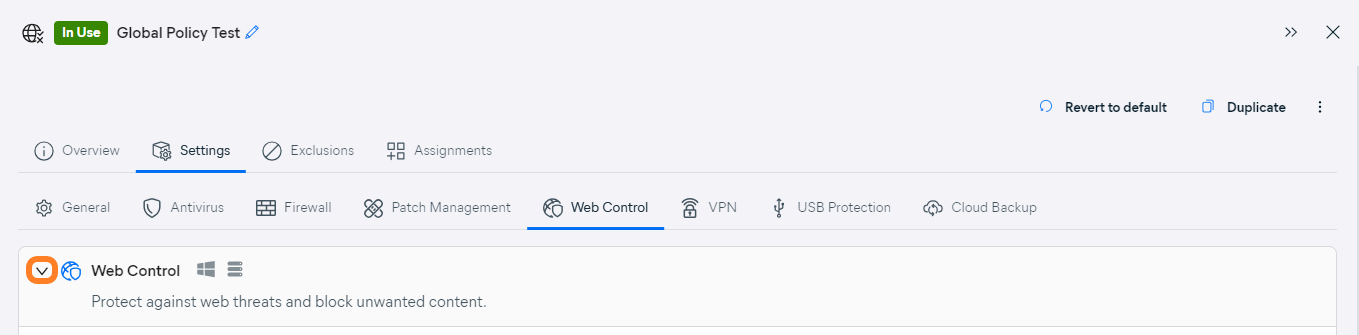
Configuring Web Control Settings
To access Web Control settings:
- Open the Policies page
- Click the desired policy to open its Detail drawer
- Click the Settings tab, then Web Control
- Expand the Web Control section
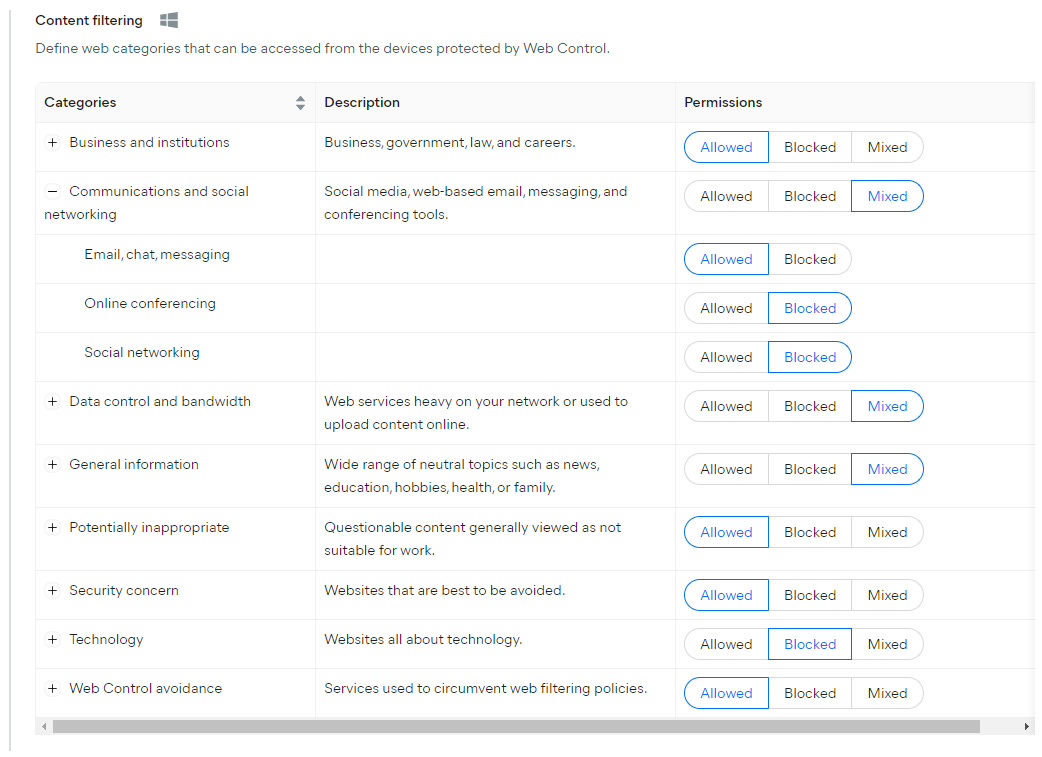
Here, you can decide which web categories Web Control will block/allow, define any specific domains to which you want to allow/deny access, check which category a website belongs to, and customize the Web Control block page.
Configuring Rules for Web Categories
Under the Content Filtering section, you can define which of the following web categories (and/or their subcategories) can or cannot be accessed from the devices with Web Control enabled:
Business and institutions – Business, government, law, and careers
- Advertising
- Business
- Careers
- Law, government & politics
- Military
Communications and social networking – Social media, web-based email, messaging, and conferencing tools
- Email, chat, messaging
- Online conferencing
- Social networking
Data control and bandwidth – Web services heavy on your network or used to upload content online
- Content servers
- File sharing
- Streaming media
General information – Wide range of neutral topics such as news, education, hobbies, health, or family
- Abortion
- Arts & entertainment
- Automotive
- Contests, freebies, couponing
- Dating
- Education
- Family & parenting
- Food & drink
- Games
- Health & fitness
- Hobbies & interests
- Home & garden
- Kids
- News, weather & information
- Personal finance
- Pets
- Real estate
- Religion & spirituality
- Science
- Shopping
- Society
- Sports
- Style & fashion
- Travel
Potentially inappropriate – Questionable content generally viewed as not suitable for work
- Adult content
- Alcohol
- Extreme graphic, explicit violence
- Gambling
- Hacking and cracking
- Hate content
- Incentivized
- Profane content
- Tobacco, cigars, vaping & accessories
- Unmoderated message boards
- Weapons
Security concern – Websites that are best to be avoided
- Copyright infringement
- Illegal content
- Illegal drugs
- Potentially unwanted apps
- Potentially unwanted search engine
- Sites containing potentially unwanted apps
- Warez
Technology – Websites all about technology
- General
- Information technology
- Media
- Web search
Web Control avoidance – Services used to circumvent web filtering policies
- Language translation
- VPNs, proxies, filter avoidance
You can allow/block an entire category or just some of its subcategories. Categories with both blocked and allowed subcategories will have their permission status automatically set to Mixed.
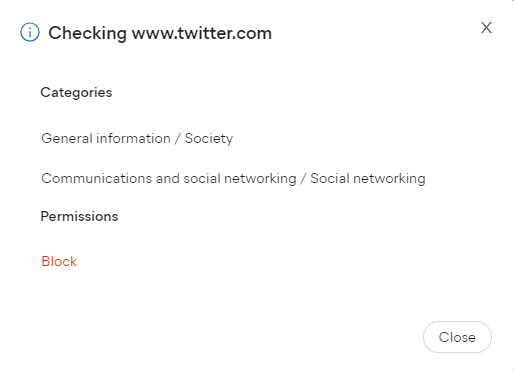
If you are unsure which (sub)category a website belongs to or what the current permission status of that website is, use the search field under Check domain.
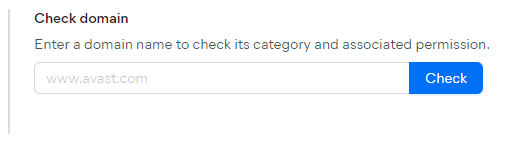
Once you type in the domain and click Check, a dialog will appear, listing all categories (and specific subcategories) that the domain falls under, and showing its current permission status (allowed/blocked).
Configuring Rules for Individual Domains
Under the Individual domain rules section of the settings, you can define specific sites to be blocked or allowed by Web Control. This is useful when you want to override category rules in certain cases (e.g. when you want to allow access to a specific website that is otherwise blocked by one or more category rules).
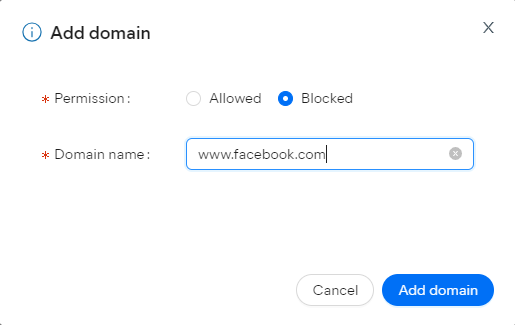
To add a new rule, use the + Add domain button at the bottom of the section.

In the dialog that opens, choose the permission type (allow or block), type in the desired website, then select Add domain.
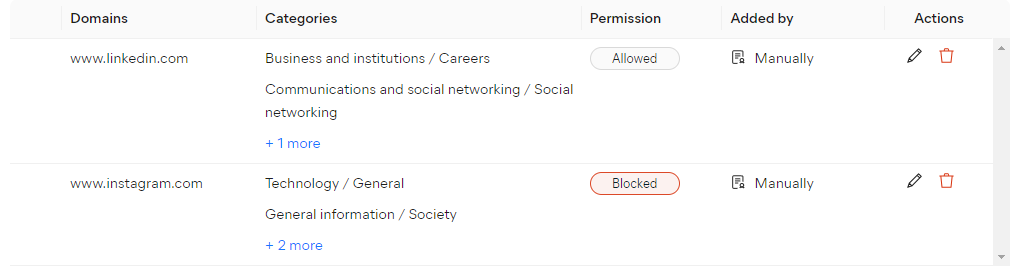
For all added domains, you can see the categories with which they are associated, their permission type, and how they were added. You can easily change their permissions or remove them from the list using the pencil/trash bin icon in the Actions column.
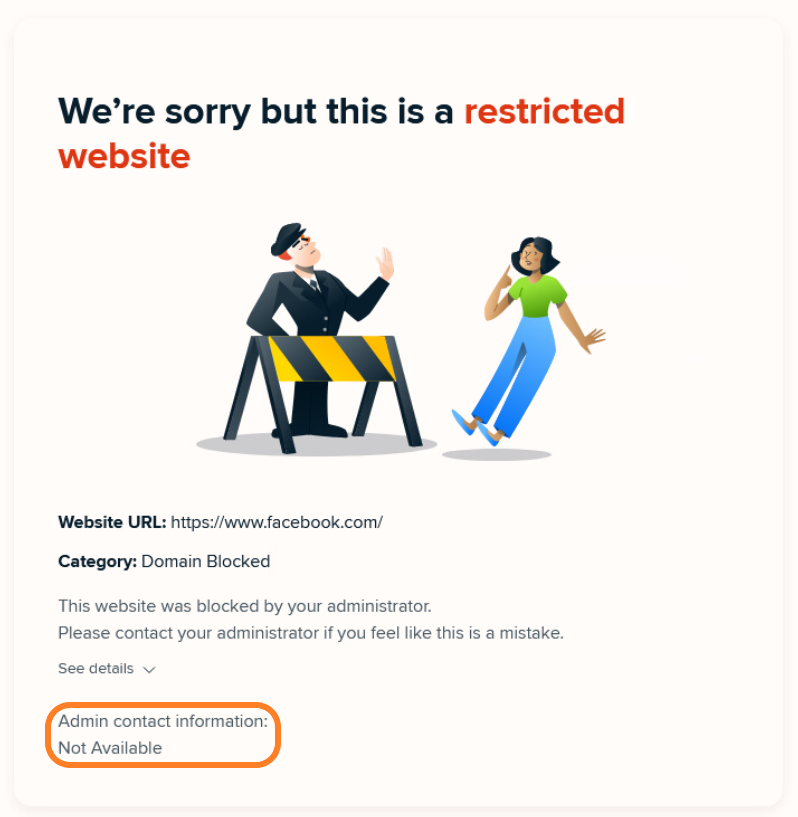
Adding Contact Information to Block Page
Under Customize your block page, you can decide if you want to add contact information to the Web Control block page so users know who to contact if required (e.g. in case they believe a site should be accessible).
Choosing Define custom contact information will let you type in an email address or phone number.
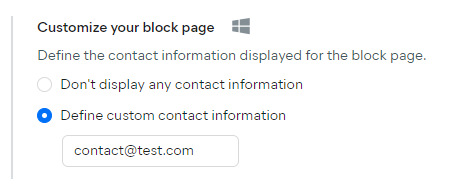
Once added, the information will be displayed at the bottom of the block page.
If the default Don’t display any contact information setting is kept, the information will be unavailable.
Viewing Blocked Web Traffic Statistics
The Web Control widget on the console’s dashboard will display the total percentage of blocked requests in the last 14 days, along with a graph showing how many of those requests were blocked by the admin and how many by Web Control automatically.
Web Control's proactive security is always on for devices using this content-filtering tool. This provides an additional layer of defense by blocking access to dangerous websites known to spread malware, spyware, spam, or engage in phishing attempts. These instances appear as Blocked as dangerous in the Web Control widget and report.
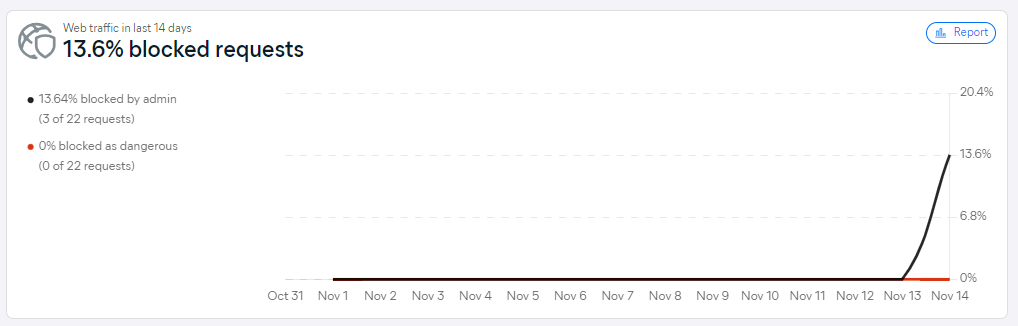
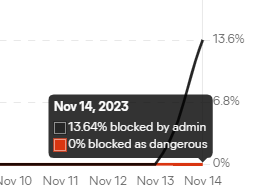
Hovering over a date will display the percentages for that particular date.
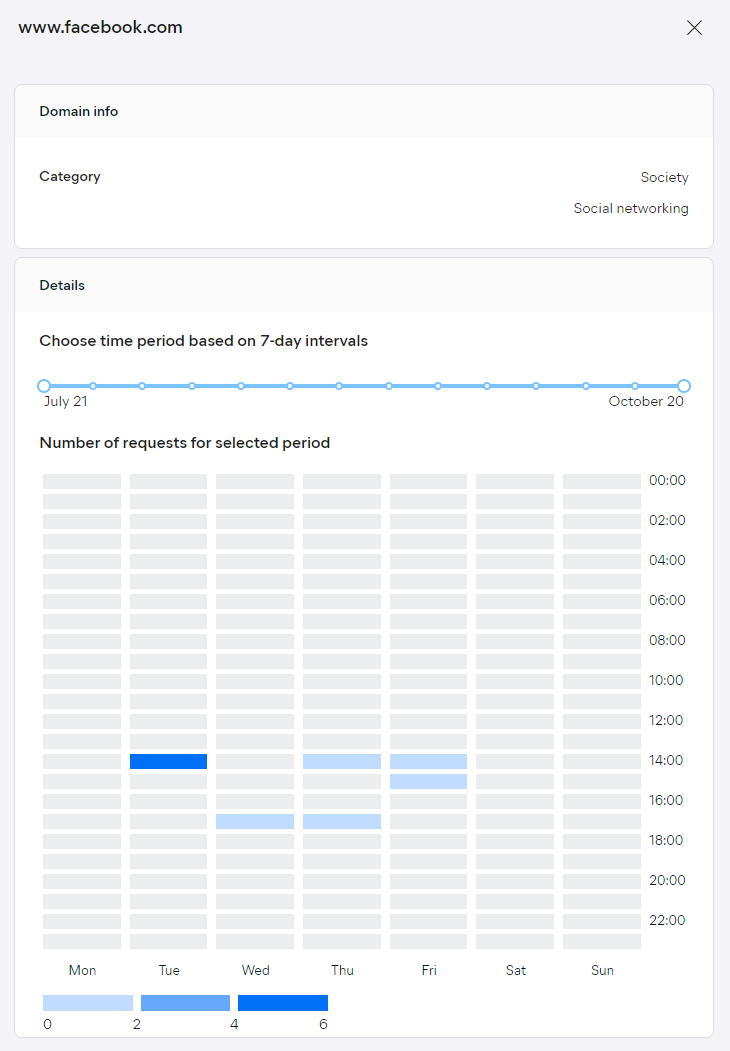
Viewing Device's Web Browsing History
You can check the browsing history of a specific device via the Web Control tab of the device’s Detail drawer. Note, however, that this information is considered sensitive, so make sure you are not going against any applicable laws by accessing this content.
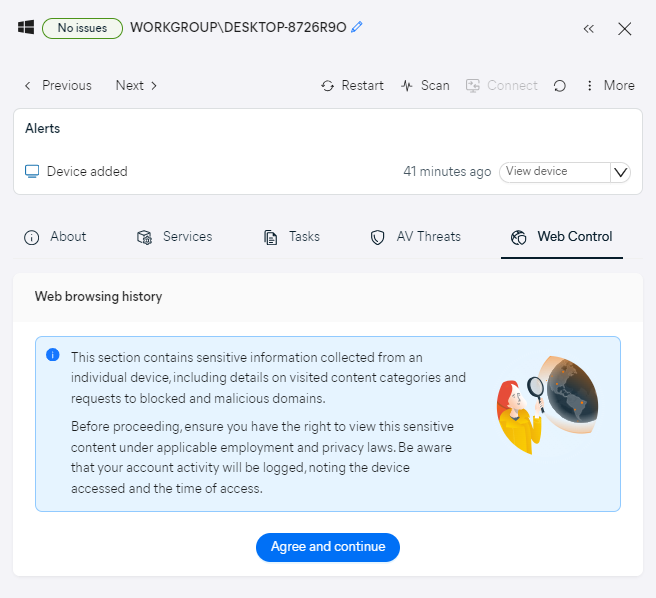
Selecting Agree and continue will display the data, which will be available for 24 hours (after which the sensitive content warning will reappear).
The information will be divided into three tabs:
- Web browsing
- Blocked requests
- Dangerous sites
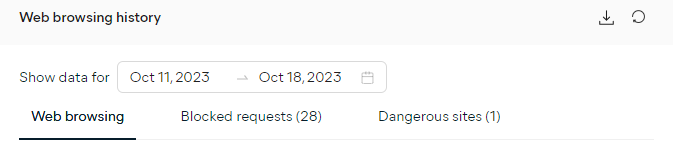
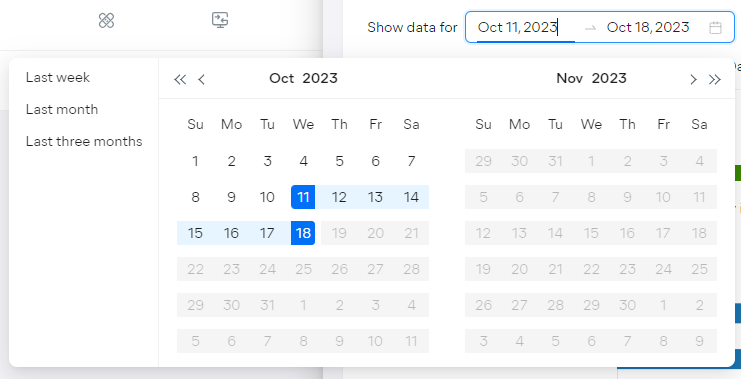
By default, information for the last seven days will be displayed. You can adjust the time frame by clicking the start or the end date and choosing different dates from the calendar, or by selecting one of the quick options on the left (Last week, Last month, Last three months).
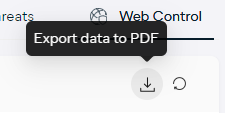
You can also export the generated data in PDF format using the download icon in the top right corner.
Web Browsing Tab
Within the Web browsing tab, you will first see the web traffic indicator, showing the proportion of business-friendly, bandwidth-consuming, potentially inappropriate, and dangerous traffic.

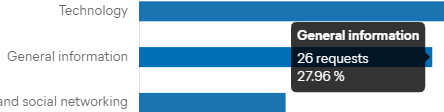
All traffic will then be broken down by category.
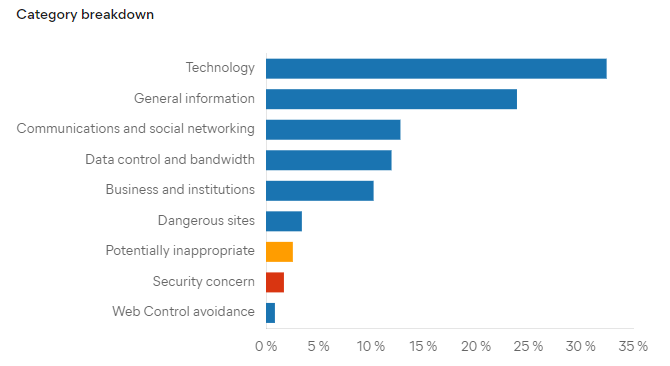
Hovering over a bar will display the exact volume (number and percentage) of requests for that particular category.
The next graph will then show which specific subcategories were visited the most.
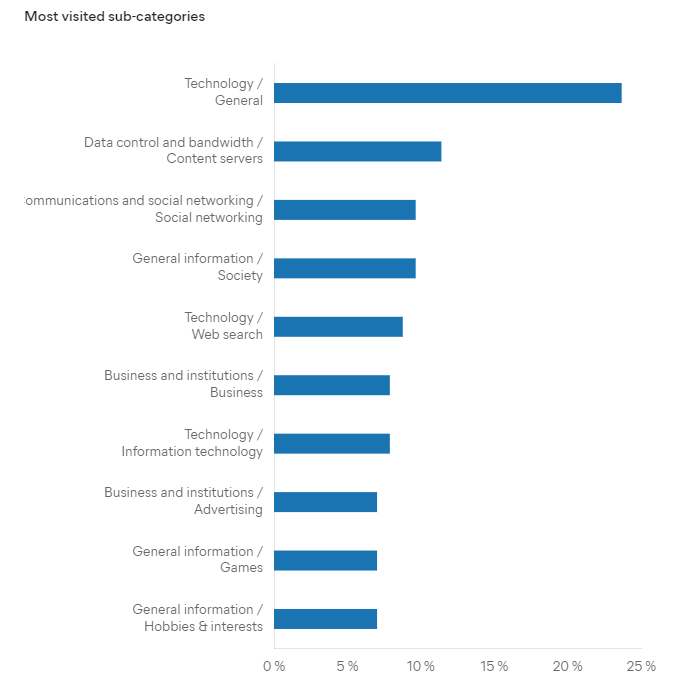
Again, hovering over a bar will display the exact volume (number and percentage) of requests for that particular subcategory.

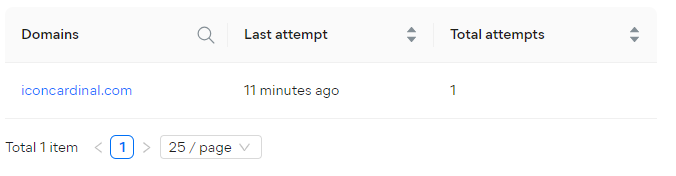
Blocked Requests Tab
This tab provides a list of all blocked attempts to access a restricted site. For each listed domain, the following information will be shown:
- Content filtering categorization
- Date/time of last attempt to access the site
- Total number of attempts to access the site

Hovering over a date/time will display more detailed information.
Also, clicking any listed website will redirect you to the related Web Control report’s details.
Dangerous Sites Tab
The Dangerous Sites tab will show if any attempts were made to access websites that are considered a security concern. You will see which websites were blocked, when the last attempt to access them occurred, and the total number of blocked attempts for each site.
Again, hovering over date/time will display more detailed information, and clicking a listed website will redirect you to the related Web Control report’s details.
Alerts
You can enable/disable Web Control console alerts via the Alert settings (accessible from the Alerts page or the Alerts widget on the dashboard).
Email alert notifications are currently not available.
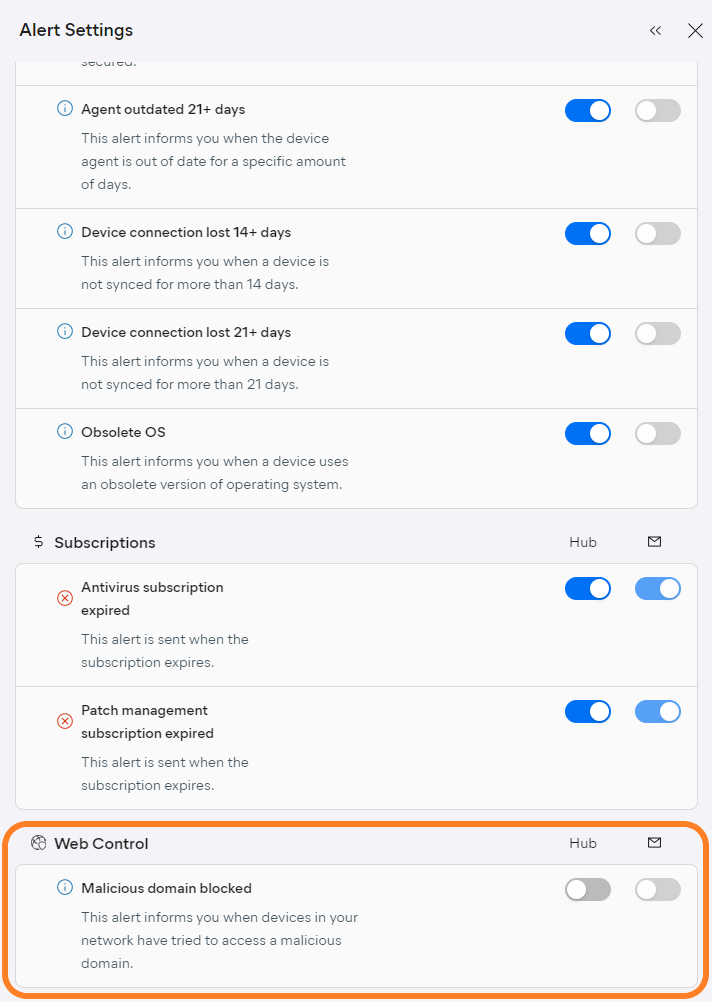
When an attempt to visit a restricted website is made, a Malicious domain blocked alert will be triggered in the console.
On the Devices page, you will see the alert under the device(s) from which the attempt was made.
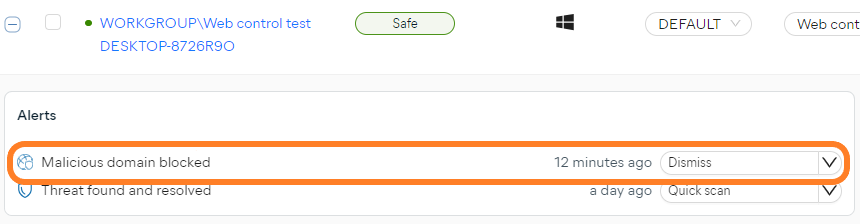
The alert will also be visible on the Alerts page.
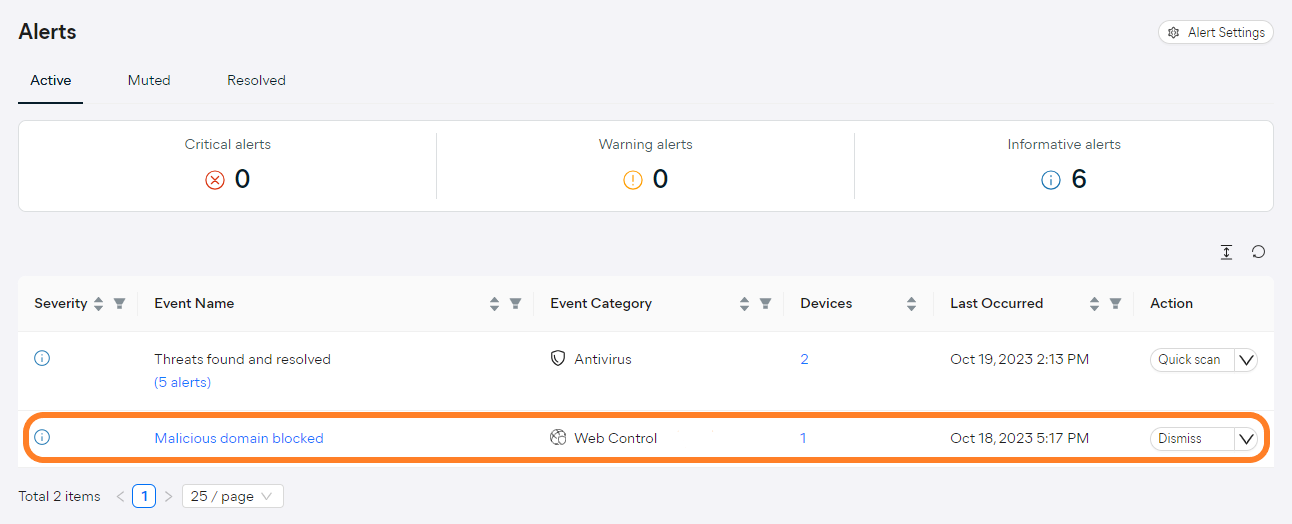
On the console’s dashboard, the Alerts widget will provide the same information.
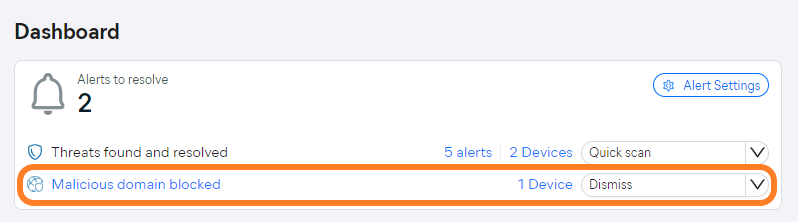
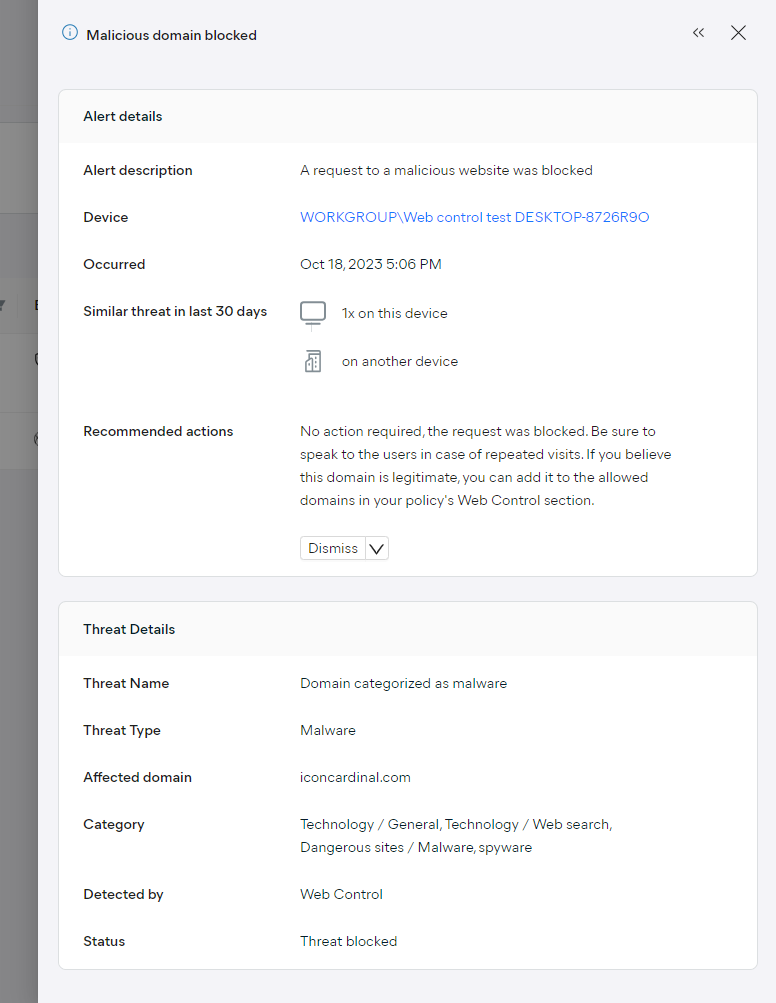
Clicking the Malicious domain blocked link will open the alert's Detail drawer, displaying the description, device, occurrence data, recommended actions (in this case, no action is required, as the connection is blocked), and threat details (name, type, domain, category, status).
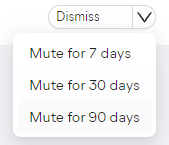
As with any other alert, you can dismiss Web Control alerts or mute them for 7, 30, or 90 days.
Web Control Report
The Web Control report provides details on all web traffic recorded on your devices within a defined time frame.
To learn more, see Web Control Report.
Audit Log Report
The Audit log report will contain information about Web Control-related events. One of the main events is the Sensitive data displayed event, which is triggered when the admin views the device detail for Web Control.

Other service-level events will be logged, such as installation/removal of Web Control.
