PROXIMANOVA-LIGHT.OTF PROXIMANOVA-LIGHTIT.OTF PROXIMANOVA-EXTRABLD.OTF PROXIMANOVA-BOLD.OTFPROXIMANOVA-BLACK.OTF
Get this font in here!
This Article Applies to:
- Avast Business On-Premise Console
When installing and configuring a CentOS 7 server with Docker to run the Avast Business On-Premise Console, we recommend the following settings:
Setting Up Remote Access and Control
When running a CentOS minimal install, it is useful to configure secure remote access. We recommend using an SSH session tool for remote terminal access, such as PuTTY. To be able to use this tool, you will also need to configure to run an SSH server using the following command: #vim /etc/ssh/sshd_config
Make the following changes to sshd_config:
- Change "#LoginGrace Time 2m" to "LoginGrace Time 1m." This will limit the time to enter login credentials to 1 minute. You can set this to a different time limit if you prefer.
- Change "#PermitRootLogin yes" to "PermitRootLogin no." This prevents a user from directly logging in as the root user over SvomSH. This does not prevent users with sudo privileges switching to root after logging in (
sudo su -). - Change "#MaxAuthTries 6" to "MaxAuthTries 2." This line may already be set at 2, but make sure the # symbol has been removed.
- Change "#MaxSessions 10" to "MaxSessions 8." This line may already be set at 8, but make sure the # symbol has been removed.
- Change "Subsystem s ftp /usr/libexec/openssh/sftp-server" to "#Subsystem sftp /usr/libexec/openssh/sftp-server." This line may already be commended out, but be sure to comment it out with the # symbol as it enables sftp access for anyone with ssh login permissions.
Additionally, you will need to configure the PAM module to limit access to the "su" command, which allows users to switch to root:
- Enter the following command:
#vim /etc/pam.d/su - Locate the line "#auth required pam_wheel.so use_uid" and remove the # symbol, then save your changes
You will need to start the ssh daemon and enable it to start automatically when the system starts. To do so, enter the following commands:
#systemctl enable sshd#systemctl start sshd
Finally, you will need to disable less secure remote connection types. These should not be installed, but these commands will verify that. If they are not installed, you will get the error "Failed to execute operation."
#systemctl disable telnet#systemctl disable rsh#systemctl disable rlogin#systemctl disable vsftpd
With ssh installed, it is possible to use a ssh utility to transfer files between your personal desktop and your CentOS server. This will require using Bash shell (Windows 10 and 11). This is a convenient method for transferring files to and from your server using the scp command.
Active Directory Integration
You may want to use Active Directory credentials to log into your CentOS 7 server. You will need the following before you can join a domain:
- Domain Admin credentials for the Active Directory domain you wish to join
- The IP address of the DNS server for the Active Directory domain you are joining
- The search domains you may want access to, including the Domain you are adding and any other search domains that already exist in your office
- The IP subnet your machine is located in. This should be in a form similar to: 10.160.22.128/25, where the number after the forward slash is your subnet mask
Once you have this information, you will need to configure your ethernet connection to add the DNS servers you are already accessing, and the DNS for the Domain you intend to join.
Configuring Ethernet Connection
- Enter the
#nmtuicommand to open the Network Manager Utility - Set hostname
- Set this to a unique name in your network and change .localdomain to the domain you will be joining, then select OK
- Edit a connection
- Etho should be the only entry
- Select your primary ethernet, which should be ens192 or etho
- Show IPv4 Configuration
- Under DNS servers, select Add and enter your Domain's DNS IP addresses, and each DNS address that is normally attained automatically
- The list of addresses normally attained automatically can be found by entering the command
#vim /etc/resolv.conf. DNS IP addresses will follow the directive "nameserver" - Some network drivers may only guarantee support for the first 3 DNS server entries, so ensure you include your Domain's DNS first, the office DNS second, and a backup DSN (either your office backup or 8.8.8.8) in the first three entries
- The list of addresses normally attained automatically can be found by entering the command
- Under Search domains, select Add and enter the Search domains you require
- The list of search domains attained automatically can be found by entering the command
#vim /etc/resolv.conf. Search domains will follow the directive "search"
- The list of search domains attained automatically can be found by entering the command
- Make sure the Automatically connect and Available to all users options both have an 'x' in their checkbox and click OK
- To ensure the DNS entries are used in the order you entered them, you will need to edit part of that connection's settings which are not accessible using nmtui. Enter the command
#vim /etc/sysconfig/network-scripts/ifcfg-<primary ethernet>- Your primary ethernet name should be ens192 or etho, and is the name of the ethernet connection you edited using
#nmtui - Change "PEERDNS=yes" to "PEERDNS=no"
- Your primary ethernet name should be ens192 or etho, and is the name of the ethernet connection you edited using
- Select Back, then OK and enter the following command to reboot your server:
#shutdown -r 0
Next, you will need to install a number of packages required for joining an Active Directory Domain.
Installing Packages Required for Joining an Active Directory Domain
- Run the command
#dnf -y install realmd sssd sssd-tools oddjob oddjob-mkhomedir adcli samba-common-tools avahi - Once this completes, edit the following files:
#vim /etc/avahi/avahi-daemon.conf. Locate the "domain-name=" line under the "[server)" heading. If this is commented out, leave it as is. If not, and it's set equal to "local", change it to the domain name you are attempting to join.#vim /etc/nsswitch.conf. Locate the line "hosts: files dns myhostname." Change the order to "dns files myhostname."
You should now be able to join your domain using the following commands:
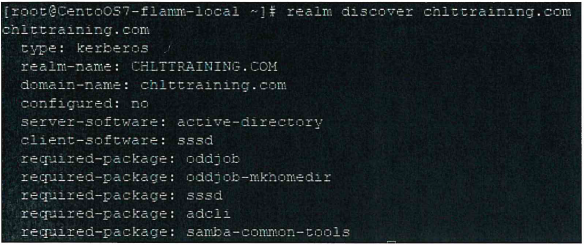
#realm discover domain Name. This will display an output similar to the below image:
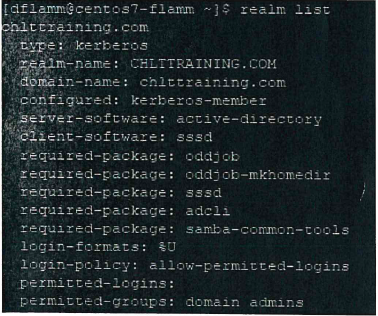
#realm join -U domain Admin domain Name. This will display an output similar to the below image:
After you have successfully joined a domain, you will want to configure Domain User access. First, for ease of use, you will want to set domain logins so they do not require the fully qualified domain name.
After you have successfully joined a domain, you will want to configure Domain User access. First, for ease of use, you will want to set domain logins so they do not require the fully qualified domain name.
- Edit the file
#vim /etc/sssd/sssd.conf - Change "use_fully_qualified_names = True" to "use_fully_qualified_names = False" and save
- Enter the following command:
#systemctl restart sssd
Next, you will want to limit which Active Directory User Groups have access to log into your Server. We recommend limiting this to Domain Admins or another group you specifically wish to give administrative rights to.
- Enter the command
#realm permit -g "user group"- User group names can be located by entering the following commands in a windows command prompt from a computer joined to the domain: net group /domain. The output will be a list of all groups
- Enter the command
#visudo - Locate the line "%wheel ALL=(ALL) ALL" and add a line below it similar to "%userl group ALL=(ALL) NOPASSWD: ALL". Any spaces in the group name must be preceded by "\". This will allow the chosen group to use the sudo command as well as su, allowing them to switch to root if necessary
Once the above is complete you should be able to reboot your server and connect using Domain credentials, and switch to root without prompting for their password again after they log in.
Secure FTP
In order to facilitate the transfer of files to and from a Linux OS, we recommend you install a file transfer protocol service. It's important to keep in mind that standard ftp transmits all information without encryption or authentication, which is why this guide will walk you through setting up a secure ftp server that uses both encryption and user authentication.
This guide uses OpenSSH's integrated sftp server capabilities, configuring specifically so that only users you add to an sftp group will be able to access your sftp server. Also, keep in mind that the limitation on the number of simultaneous ssh sessions will also apply to the number of sftp sessions.
In order to connect to an sftp server we recommend downloading a utility on your workstation such as Filezilla. Additionally, when using sftp be sure to enter the server address in the format “sftp://serverNameOrlP". Also, be aware of which port you've added your sftp server to as you will need to enter this as well. This guide uses port 22220.
In order to install a secure ftp service with proper user access control we'll first need to create and configure a second instance of the SSH service we set up earlier. To do this, use the following commands:
#groupadd sftp_users#mkdir /sftp#chown root:root /sftp#cp /etc/ssh/sshd{,-second}_config#vim /etc/ssh/sshd-second_config
Then do the following:
- Locate the following lines and verify their values are as shown below. If they do not exist, add them below the lines for "AcceptEnv".
- Port 22220
- PidFile /var/run/sshd-second.pid
- Protocol 2
- Subsystem sftp internal-sftp
- AllowGroups sftp_users
- ForceCommand internal-sftp
- ChrootDirectory /sftp/%u
- PermitTunnel no
- AllowAgentForwarding no
- X11 Forwarding no
- Allow TcpForwarding no
- Change "Description=OpenSSH server daemon" to "Description=OpenSSH SFTP server daemon."
- Change "After=network.target sshd-keygen.service" to "After=network.target network.target auditd.service sshd.service."
- Change "ExecStart=/usr/sbin/sshd -D $OPTIONS" to "ExecStart=/usr/sbin/sshd -D -f /etc/ssh/sshd-second_config $OPTIONS."
- Save the file and run the following commands:
#semanage port -a -t ssh_port_t-p tcp 22220#firewall-cmd --permanent --add-port=22220/tcp#firewall-cmd --reload#setsebool -P ssh_chroot_rw_homedirs on#systemctl enable sshd-second#systemctl start sshd-second#shutdown -r
After configuring the sftp server you will still need to grant access for each user you wish to be able to log in. For each user you wish to grant sftp access to, run the following commands:
#usermod -aG sftp_users <userName>#mkdir /sftp/<userName>#mkdir /sftp/<userName>/sftp_dir#chown -R root:root /sftp/<userName>#chown -R <username> sftp_users /sftp/<userName>/sftp dir#chmod -R 755 /sftp/<userName>
If you ever need to revoke a user's sftp access, use the following command: #gpasswd -d <userName> sftp_users #rm -R /sftp/<userName>.
Other Articles In This Section:
Preparing CentOS 7 Linux Server
Installing Docker Compose on Linux
Installing On-Premise Console on Linux
Updating and Upgrading Docker on Linux
Updating On-Premise Console on Linux
Backing Up and Restoring On-Premise Console Database on Linux
Related Articles: