PROXIMANOVA-LIGHT.OTF PROXIMANOVA-LIGHTIT.OTF PROXIMANOVA-EXTRABLD.OTF PROXIMANOVA-BOLD.OTFPROXIMANOVA-BLACK.OTF
Get this font in here!
This Article Applies to:
- Avast Business CloudCare
IMPORTANT: This CloudCare service has been officially retired (see CloudCare Services EoL). If you were using this service, please reverse the network-wide protection settings.
Secure Web Gateway is an additional service provided to all customer types to help secure and protect web traffic on end devices.
Avast Business CloudCare strongly advises against using both Secure Web Gateway and Content Filtering on the same device, as they will interfere with each others' functionality.
Policy Settings
General Settings
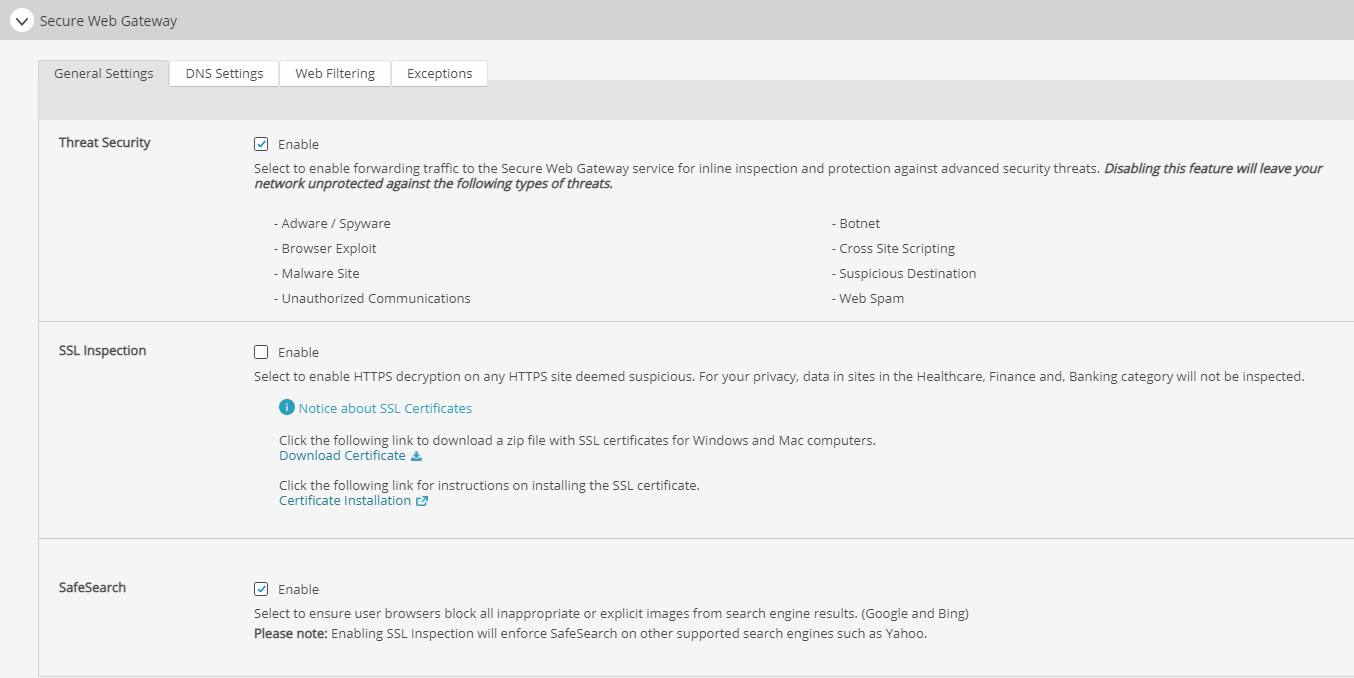
Threat Security: if a user requests a URL that has been deemed suspicious according to Secure Web Gateway‘s threat scoring mechanism, the SWG service will perform a full in-line inspection of content and will provide the following security features:
- Protection against basic spyware and malware as well as other advanced threats, such as botnets, malicious active content, unauthorized communications, and cross-site scripting.
- When necessary, integrating file sandbox analysis for all Windows executable files and Dynamic Link Libraries (DLL) of traffic from URLs in suspicious categories.
SSL Inspection: enables HTTPS decryption on any HTTPS site Secure Web Gateway deems suspicious according to its threat scoring mechanism, with the exception of sites in the Healthcare, Finance, and Banking URL categories. To protect users’ privacy, Secure Web Gateway does not perform SSL inspection for those three categories.
In order for SSL Inspection to work correctly, a root certificate must be installed on the endpoints that do not have the Secure Web Gateway agent installed. This will prevent browser warnings about SSL certificates. There are multiple links in this section: one will allow you to download a SSL root certificate, and another link will instruct you in installing the certificate.
Safe Search: Secure Web Gateway will ensure the supported browsers block all inappropriate or explicit images from search engine results. Users cannot bypass this restriction in their browser settings. Current supported search engines are Google, Bing, and Yahoo! Search.
DNS Settings
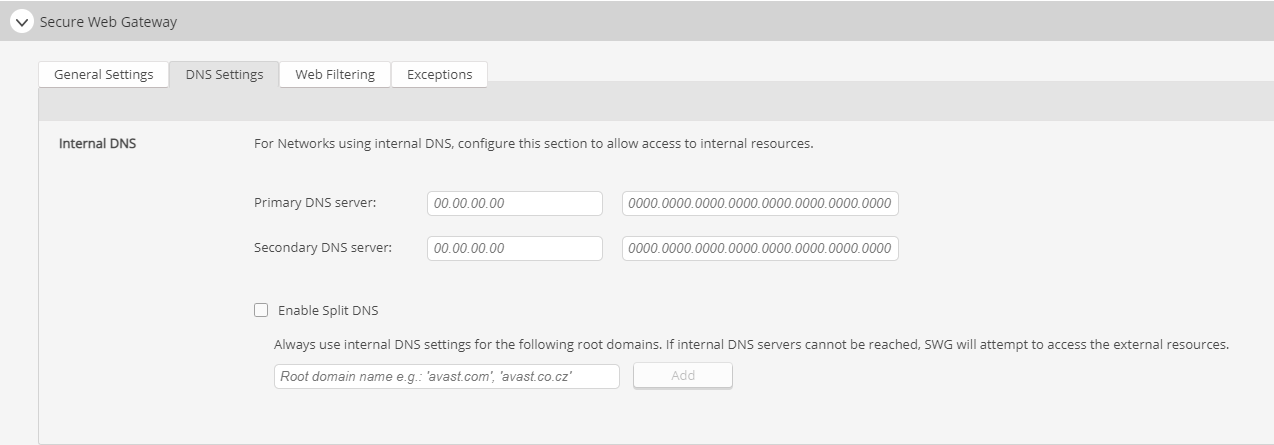
For networks using Internal DNS, Secure Web Gateway will need the DNS server details to correctly allow access to internal resources. You can enter the primary and secondary DNS server information in the text boxes.
If you are using Split DNS, click the check box beside Enable Split DNS and enter the root domains for which you would like to use internal DNS settings.
Web Filtering
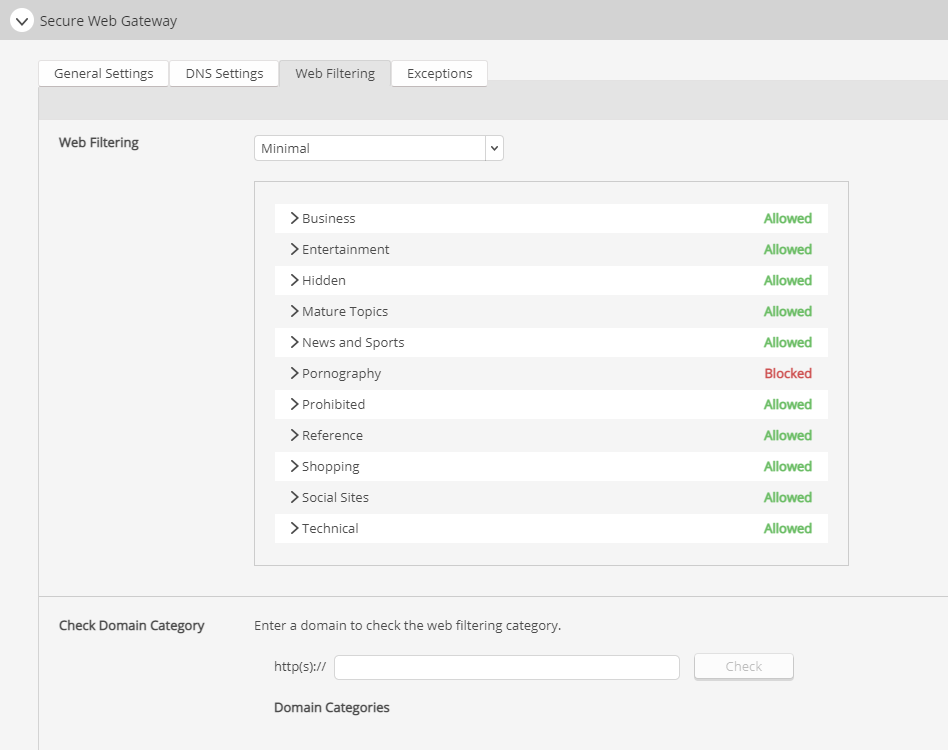
Most websites are classified into predefined categories which identify the topics of interests that are the main focus of the website. These categories are then put into Category Groups, which are filtered with default settings; however, you can change the status for categories and category groups at any time.
You can select how sensitive or strict the Secure Web Gateway‘s web filter is using the drop-down menu. Your options are: Off, Minimal, Moderate, Strict, All, or Custom. If you select Custom you will be able to select Allowed or Blocked for every single URL category in the list.
You can verify the URL category of a domain by entering it into the text box beside Check Domain Category and clicking Check.
Exceptions
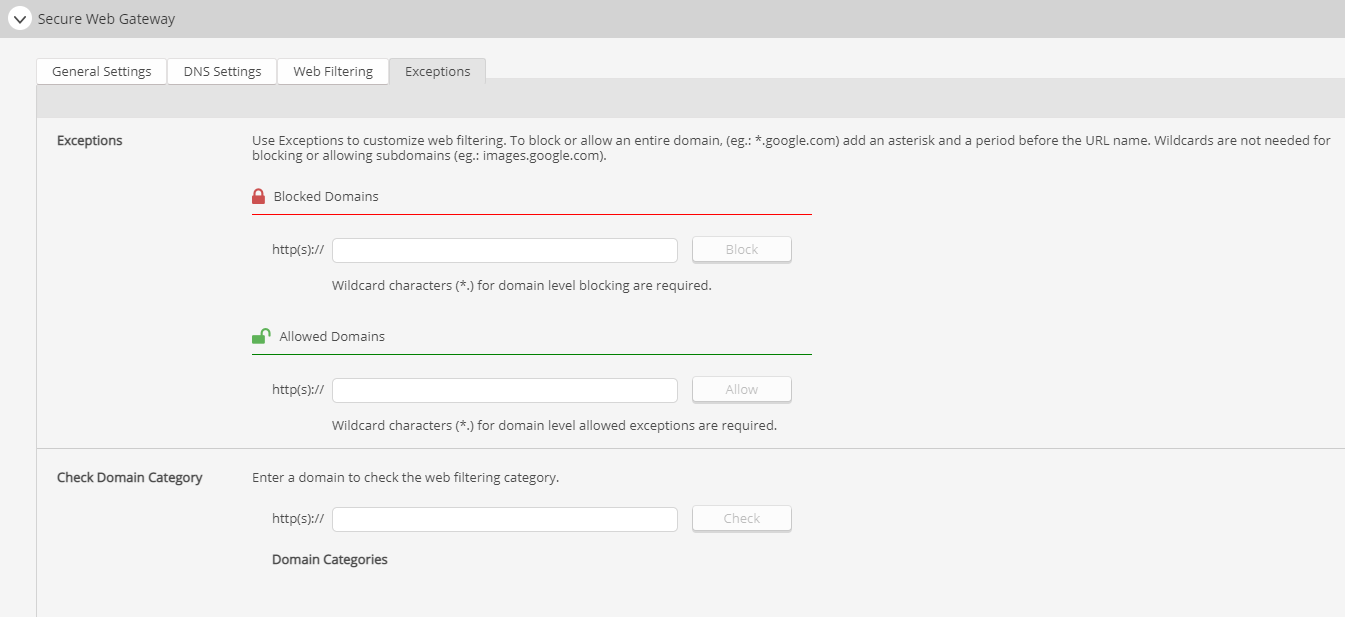
You can customize web filtering using exceptions. To block or allow an entire domain, add an asterisk and a period before the URL name (eg.: *.google.com). Wildcards are not needed for blocking or allowing subdomains. Enter blocked and allowed domains into the proper text boxes and click either Block or Allow.
You can verify the URL category of a domain by entering it into the text box beside Check Domain Category and clicking Check.
Always Allowed Domains
Every SWG account populates a list of domains that are never to be blocked, as they are required for communication with Avast platforms, sites, and properties. The majority of these domains would not be blocked by SWG except in a customer-configured "Block All" situation, which would cause the CloudCare agent and its components to be unable to function properly.
If a customer enters one of these domains into the Always Allowed list, they will not populate since they are already allowed on the back end. Additionally, customers cannot add these domains into the Always Blocked list.
 Domain List
| activeprotection.com | avg-antimalware.cz | avg.com.ph | clients2.google.com | sugg.search.yahoo.net |
| activeprotection.org | avgantimalware.cz | avg.com.pr | clients3.google.com | verisign.com |
| activeprotect.net | avg-antimalware.eu | avg.com.pt | clients4.google.com | windowsupdate.com |
| activeprotect.org | avgantimalware.eu | avg.com.py | clients5.google.com | www.islonline.net |
| adaptiveprofiling.net | avg-antispyware.com | avg.com.tr | fpdownload.macromedia.com | xmppccde.m.in-app.io |
| adaptiveprotection.com | avgantispyware.com | avg.com.ve | google-analytics.com | xmppcc.m.in-app.io |
| adaptiveprotection.net | avg-antispyware.co.uk | avg.co.uk | googleapis.com | |
| adaptiveprotection.org | avgantispyware.co.uk | avg.cz | localhost.local | |
| anti-malware.co.uk | avg-antispyware.cz | avg.de | lplic.levelplatforms.com | |
| antimalware.co.uk | avgantispyware.cz | avg.es | *.managedoffsitebackup.net | |
| api.bing.com | avgantivirus.com | avg.hk | microsoft.com | |
| attackshield.net | avgcloud.net | avg.ie | mmi.explabs.net | |
| *.avast.com | avg.co.il | avg.in | mwcloudplatform.com | |
| avast.com | avg.co.in | avg.org | prev.explabs.net | |
| *.avcdn.net | *.avg.com | avg.pe | secure.bsecure.com | |
| avcdn.net | avg.com | avgthreatlabs.com | *.sosonlinebackup.com | |
| avg.ae | avg.com.cy | avg.uk.com | sosonlinebackup.com | |
| avg-antimalware.com | avg.com.ec | bsecure.com | *.storagecraft.com | |
| avgantimalware.com | avg.com.es | check.sanasecurity.com | submit.sanasecurity.com | |
| avgantimalware.co.uk | avg.com.pe | clients1.google.com | suggestqueries.google.com |
Setting Up Network-Wide Protection
You can protect devices on your network with no CloudCare Agent by configuring Network Device level protection. There are a few considerations while configuring perimeter-level protection following the steps below.
Register Static Public IP Address With SWG Servers
You should only configure this level of protection if you wish to protect all devices that are in your network. The option will be available on the customer's dashboard after you've added the SWG service to at least one device.
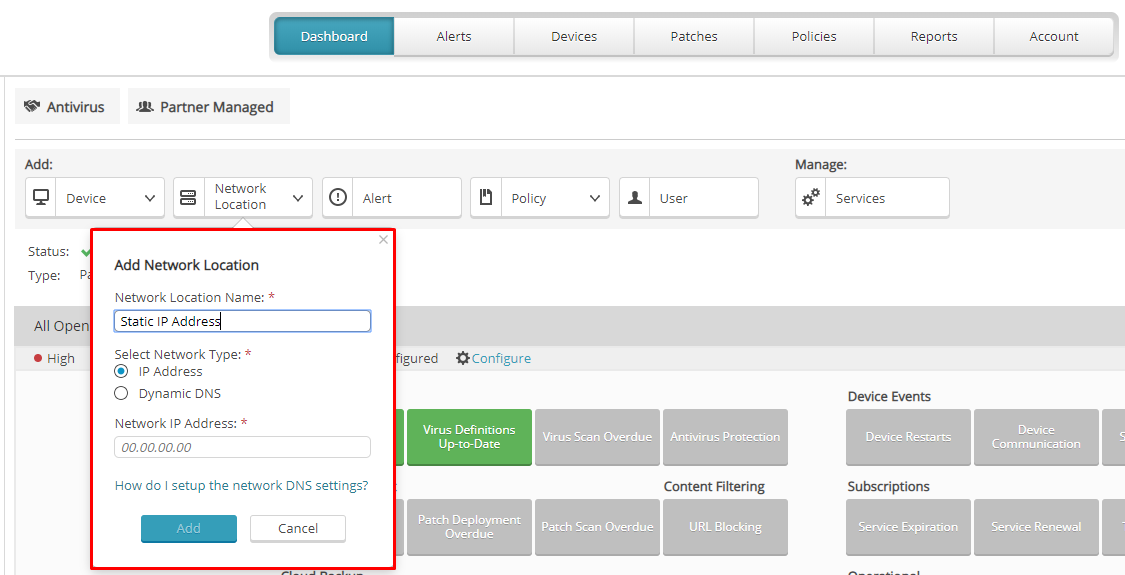
This is done by adding a Network Location and entering your public IP address (WAN IP) in the Add Network Location screen. Correct account and policy are identified and enforced when SWG servers receive DNS requests from your static public IP address.
Static WAN IP Address
If your public IP address is static, select IP Address and specify the static IP address of your network on the Add Network Location screen.
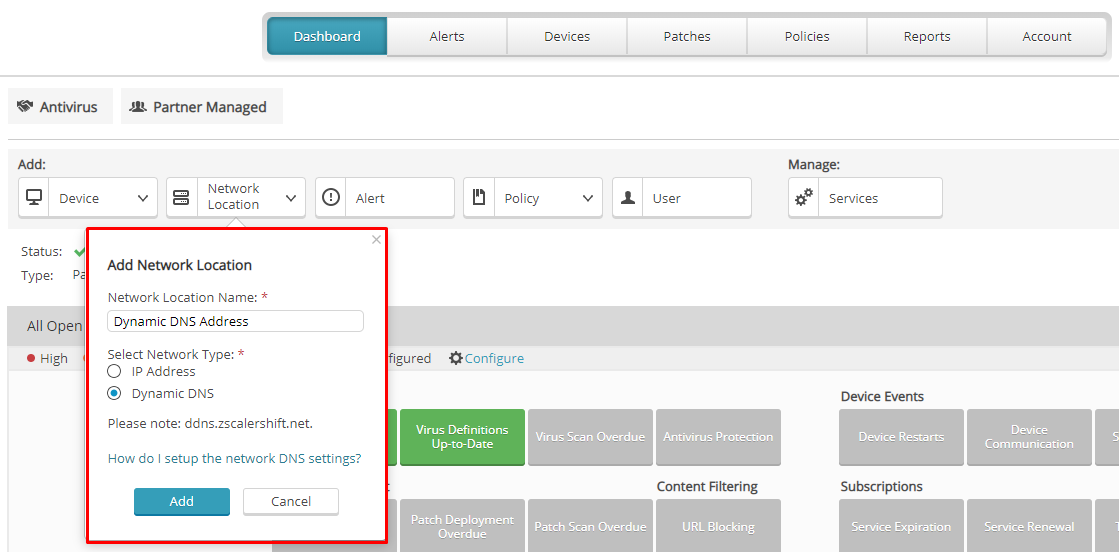
Dynamic WAN IP Address
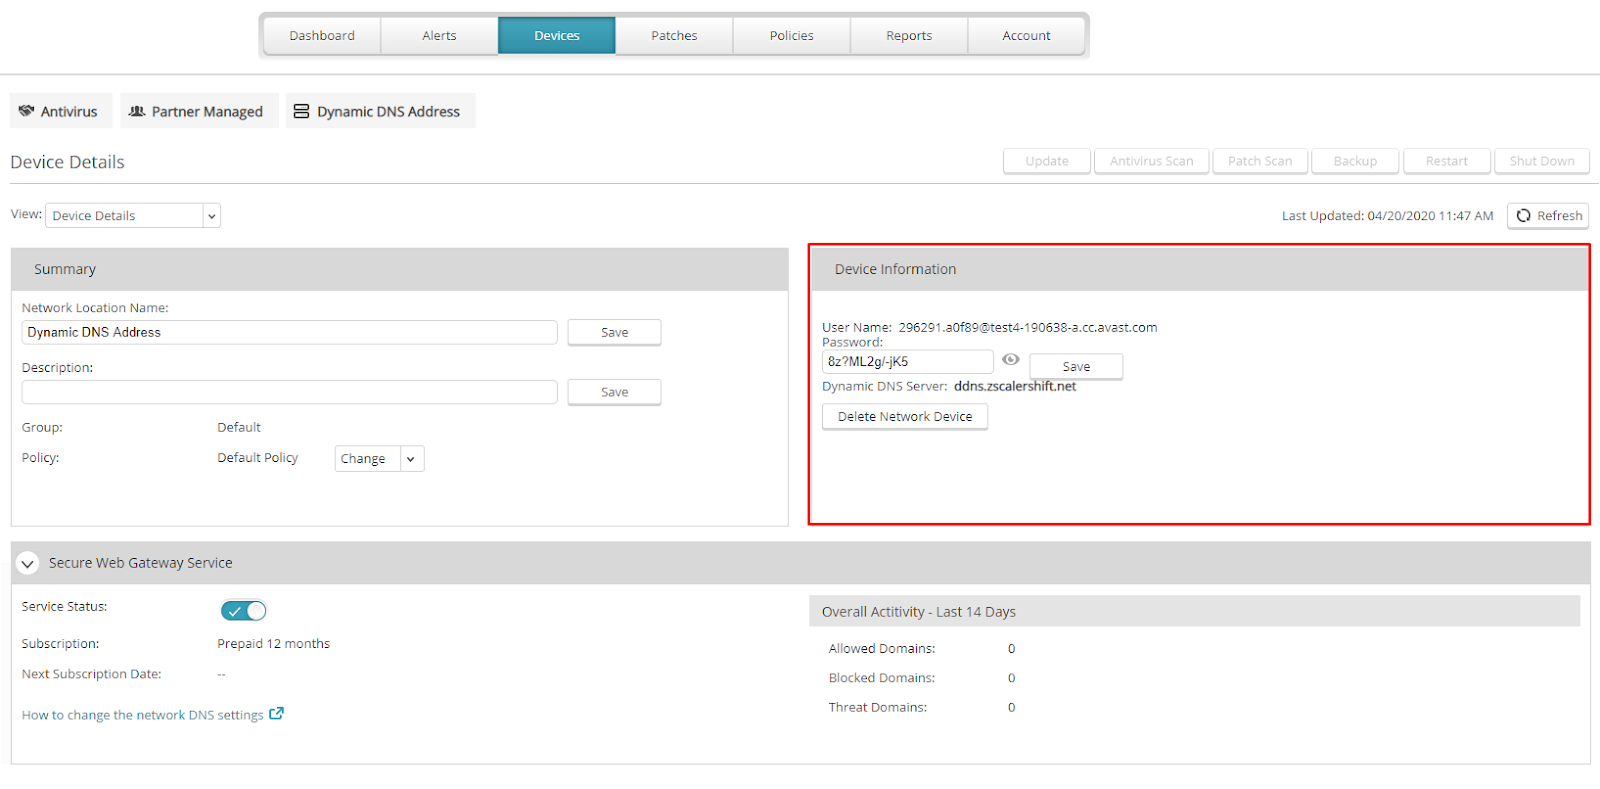
If your public IP address is dynamic, select Dynamic DNS on the Add Network Location screen. A username and password will be automatically generated for you, which you can find in Device Details for the network location. You can also change the password, which must contain at least eight characters, one number, and one uppercase letter.
After you obtain your username and password from Device Details, configure your router to use the DynDNS protocol. Specify the server: ddns.zscalershift.net. If your router does not support Dynamic DNS, a DynDNS update client can be installed on one of your host machines.
If your DynDNS client requires a hostname, you can enter any hostname as this will be ignored by CloudCare.
Direct DNS Requests to SWG Servers
Without Internal DNS Servers
In this situation, it is best to have your router forward DNS requests to the Secure Web Gateway DNS addresses. This is generally done at the router. This will ensure that all devices in the network send their DNS requests to the Secure Web Gateway so that the policy assigned to the Network Location will be applied to all those devices.
- Open the preferences for your router
- Often, the router preferences can be accessed from your web browser, via a URL with numbers (such as
http://192.168.0.1orhttp://192.168.1.1). You may need a password- You can reset the router password to the default manufacturer password by pressing the reset button on the router itself.
- Preferences may be set via a specific application for your router which you installed on your computer when you added the router
- Often, the router preferences can be accessed from your web browser, via a URL with numbers (such as
- Find the DNS server settings
- Scan for the letters DNS next to a field which allows two or three sets of numbers, each broken into four groups of one to three numbers. It might look like this:
208.67.222.222208.67.220.220
- Please write down your current settings before entering the Secure Web Gateway (SWG) DNS addresses for future reference.
- Scan for the letters DNS next to a field which allows two or three sets of numbers, each broken into four groups of one to three numbers. It might look like this:
- Input the Secure Web Gateway (SWG) DNS server addresses as your DNS server settings and save/apply
8.34.34.34(primary)8.35.35.35(secondary)
- Check your Settings
- Once you have configured your DNS, verify the router has retained the settings by refreshing the page or closing and re-opening the router application
With Internal DNS Servers
In this case, it is best to leave your DHCP settings in the router as they are (handing out your internal DNS addresses), and configure your DNS server to forward requests to the Secure Web Gateway DNS servers. This will ensure that all external name resolutions are forwarded to Secure Web Gateway, and the policy assigned to the Network Location will be applied to all devices (without agents) in your network. Any internal host names will continue to be resolved by your DNS server without forwarding to SWG servers.
- Log into the DNS server as an administrator
- Click Start usually located in the bottom-left corner
- Type
DNSMgmt.mscand press theENTERkey to open the DNS Manager - Right-click the DNS server in the left panel
- Click Properties
- Navigate to the Forwarders tab
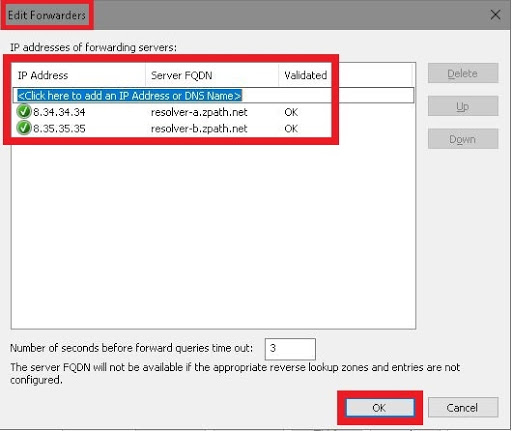
- Click the Edit button to add DNS servers to the list
- Click on Click here to add an IP Address or DNS Name to input the Secure Web Gateway (SWG) DNS server addresses as your DNS server settings:
8.34.34.34(first)8.35.35.35(second)
- Click OK
- Click Apply/OK to confirm and exit the manager
Apply Policies
Once you have configured protection, you will want to apply policies to ensure protection.
Network-Level Protection
After creating a Network Location, it will appear in your device list and is available to have a policy assigned to it. Once you apply a policy to the Network Location, all devices that will receive that policy.
Only the settings for Secure Web Gateway in a policy will be assigned to the non-agent devices. All other services in that policy are not applicable for Network Locations.
Agent-Level Protection
Configure your SWG policy for the installed device along with the policies for the other services such as Antivirus and Cloud Backup. The selected policy will be associated with the agent, and the SWG policy for the agent will override any Network level protection.
Install Root Certificate Authority (Optional)
For devices with no agent, it is recommended that you install the root certificate to avoid browser errors when blocking or inspecting an SSL (https) site.
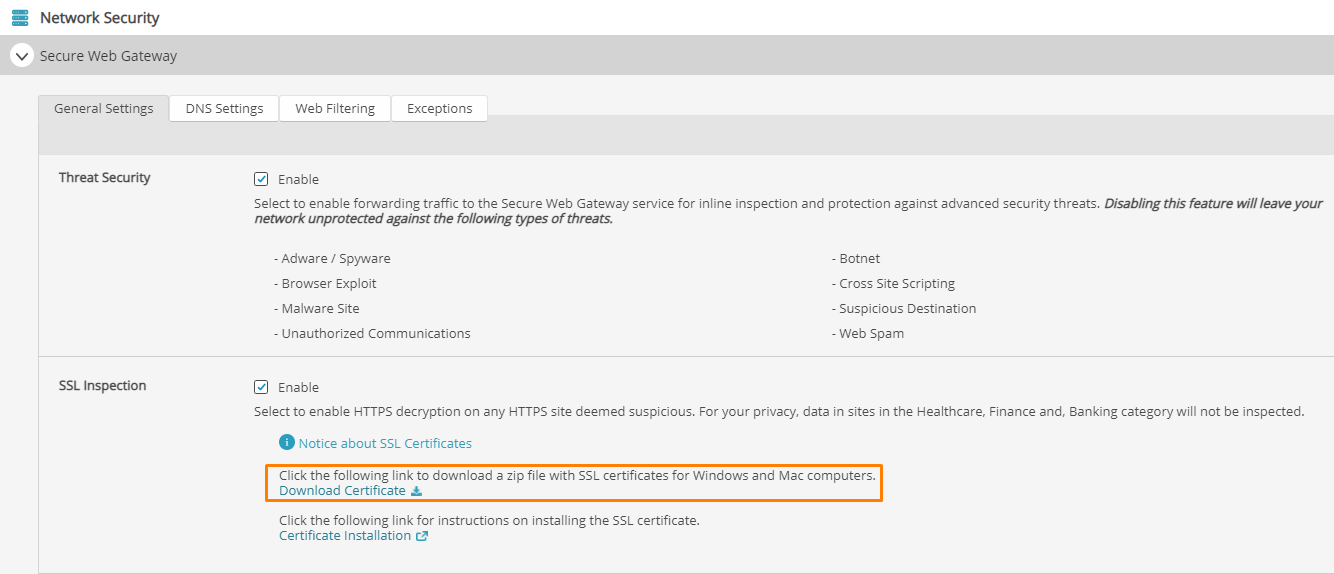
- Open the policy you are using SWG on
- Expand the Secure Web Gateway section
- In the SSL Inspection section, click Download Certificate
To install or distribute certifications, please see SSL Certificate Installation Instructions below, or Microsoft's article Distribute Certificates to Client Computers by Using Group Policy.
When an agent is installed on a device, you are not required to manually install any certificates since the agents perform the certificate management.
Agents
Enabling SWG on an agent-based device will allow you to apply a different policy to those agents. The agent policy will override the Network policy, and the agents will continue to be protected when off-network.
If you have your own internal DNS server with private names that are not propagated externally, you must input your internal DNS server IP information within the CloudCare policy that is assigned to the agent-based device. This will allow an SWG agent to service the requests for internal resources within the network. This setting can be found by going to the policy you have assigned to agents and expanding the Secure Web Gateway Policy. Then select the DNS settings tab, and enter your internal DNS IP addresses in the Internal DNS settings section.
You can use any combination of Agent-based and Network level protection depending on your needs. For example, you may only want to protect your Windows-based devices by installing agents and assigning an SWG policy to those agents. They will be protected no matter where they are.
If you want to protect all device types without using agents, the Network level protection would be more suitable. The devices would be protected while on your network only.
Finally, you can configure Network level protection for all non-agent devices while on the network and configure Agent level protection for devices with Agents.
Configuring Split DNS
Split-Brain DNS, Split-Horizon DNS, or Split DNS are terms used to describe when two zones for the same domain are created, one to be used by the internal network, the other used by the external network (usually the Internet).
- Open the policy assigned to your Network Location(s)
- Expand the Secure Web Gateway section
- In the DNS Settings tab, enter the following information:
- Primary DNS server
- Secondary DNS server
- Check Enable Split DNS. This will always use internal DNS settings for specified root domains
- Enter each desired root domain name in the box and click Add
- Click Save & Apply to Customers/Devices
SSL Certificate Installation
Windows Devices
Microsoft Edge
- After downloading the SSL Certificate file, open Microsoft Edge
- Click the three dots in the top right and select Settings
- Go to the Privacy, search, and services tab
- In the Security section, click Manage Certificates
- Click Import
- When the Certificate Import Wizard appears, click Next
- Browse to the Zscaler root certificate and click Open to select it, then click Next
- When you are asked to select a location for the Zscaler root certificate, select Trusted Root Certification Authorities
- Click Finish
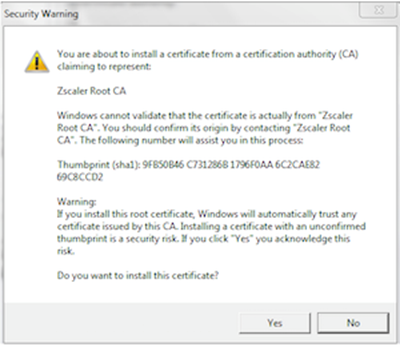
- When the browser displays the warning shown below, click Yes
Google Chrome
- After downloading the SSL Certificate file, open Google Chrome
- Click the three dots in the top right and select Settings
- In the Privacy and security section, click Security
- Click Manage certificates
- Click Import
- Browse to the Zscaler root certificate and click Open to select it, then click Next
- When you are asked to select a location for the Zscaler root certificate, select Trusted Root Certification Authorities
- Click Finish
macOS Devices
- Download and open the
SWGRootCert.zipfile - Unzip
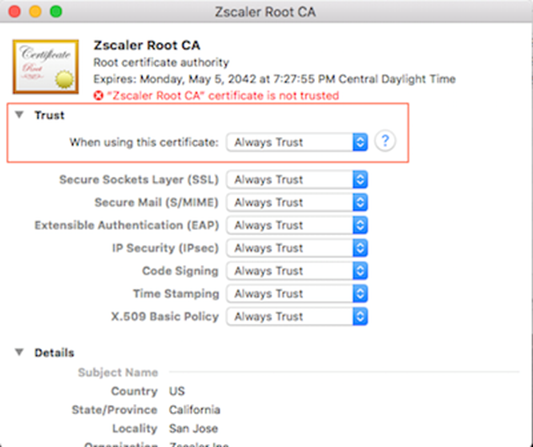
SWGRootCerticate.zipthen double click on theZscalerRootCertificate.crtfile within the folder - The Keychain Access folder should open. Double click on Zscaler Root CA certificate
- Expand the Trust section
- In the When using this certificate field, select Always Trust from the dropdown
- You will be prompted for your device password; after entering it, press Modify Keychain
- You will see the certificate status change to trusted in the key chain access window
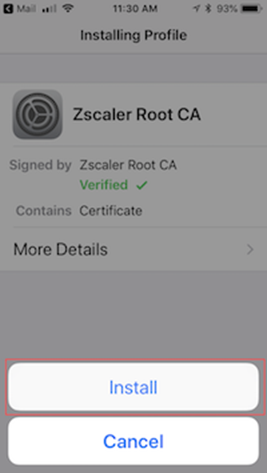
iOS Devices
- From your desktop, download and unzip the
SWGRootCert.zipfile - Email the extracted SSL Certificate to yourself
- From your phone, open the email containing the file and save it
- Open the Certificate file
- If you have multiple Apple devices select the one you would like to install on
- Tap Install in the top right
- Tap Install to confirm
Android Devices
- From your desktop, download and email the
SWGRootCert.zipfile to yourself - From your phone, open the email containing the file and save it
- Unzip and extract the file on your phone
- Navigate to Settings, then either Security or Advanced Settings depending on your OS version
- Navigate to Credential Storage
- Tap Install
- Navigate to the location you saved the SSL Certificate and select it
- You will be prompted for your device password or fingerprint
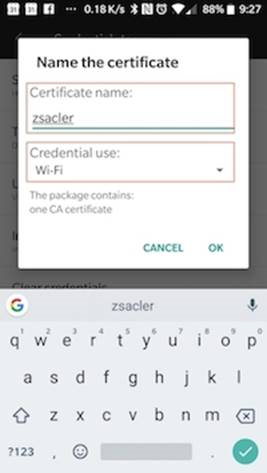
- Enter a name for the certificate, then select Wi-Fi in the Credential use box
- Tap OK